AWS IoT
warning
The document is a continuation of the previous document, if you have landed directly on this page then, Please read from page Get started.
What is AWS IoT?
AWS IoT core is an AWS Cloud service that allows IoT devices to send data to AWS services and receive data from the AWS services.

List of AWS IoT features implemented in Shunya stack
With Shunya stack you can make IoT device to act as a MQTT client i.e you can
- Send data to AWS IoT service.
- Receive messages from AWS IoT service.
Using AWS IoT Shunya stack
Requirements to use AWS IoT Shunya stack
- Shunya OS installed (supported Arm devices) or Shunya OS docker container (X86 based windows/linux devices)
- AWS account.
Steps to use AWS IoT Shunya stack
- Register your IoT Device to AWS IoT Core Service (one time setup)
- Set AWS IoT settings in Shunya.
- Send data to AWS IoT Service.
- Receive messages from AWS IoT Service.
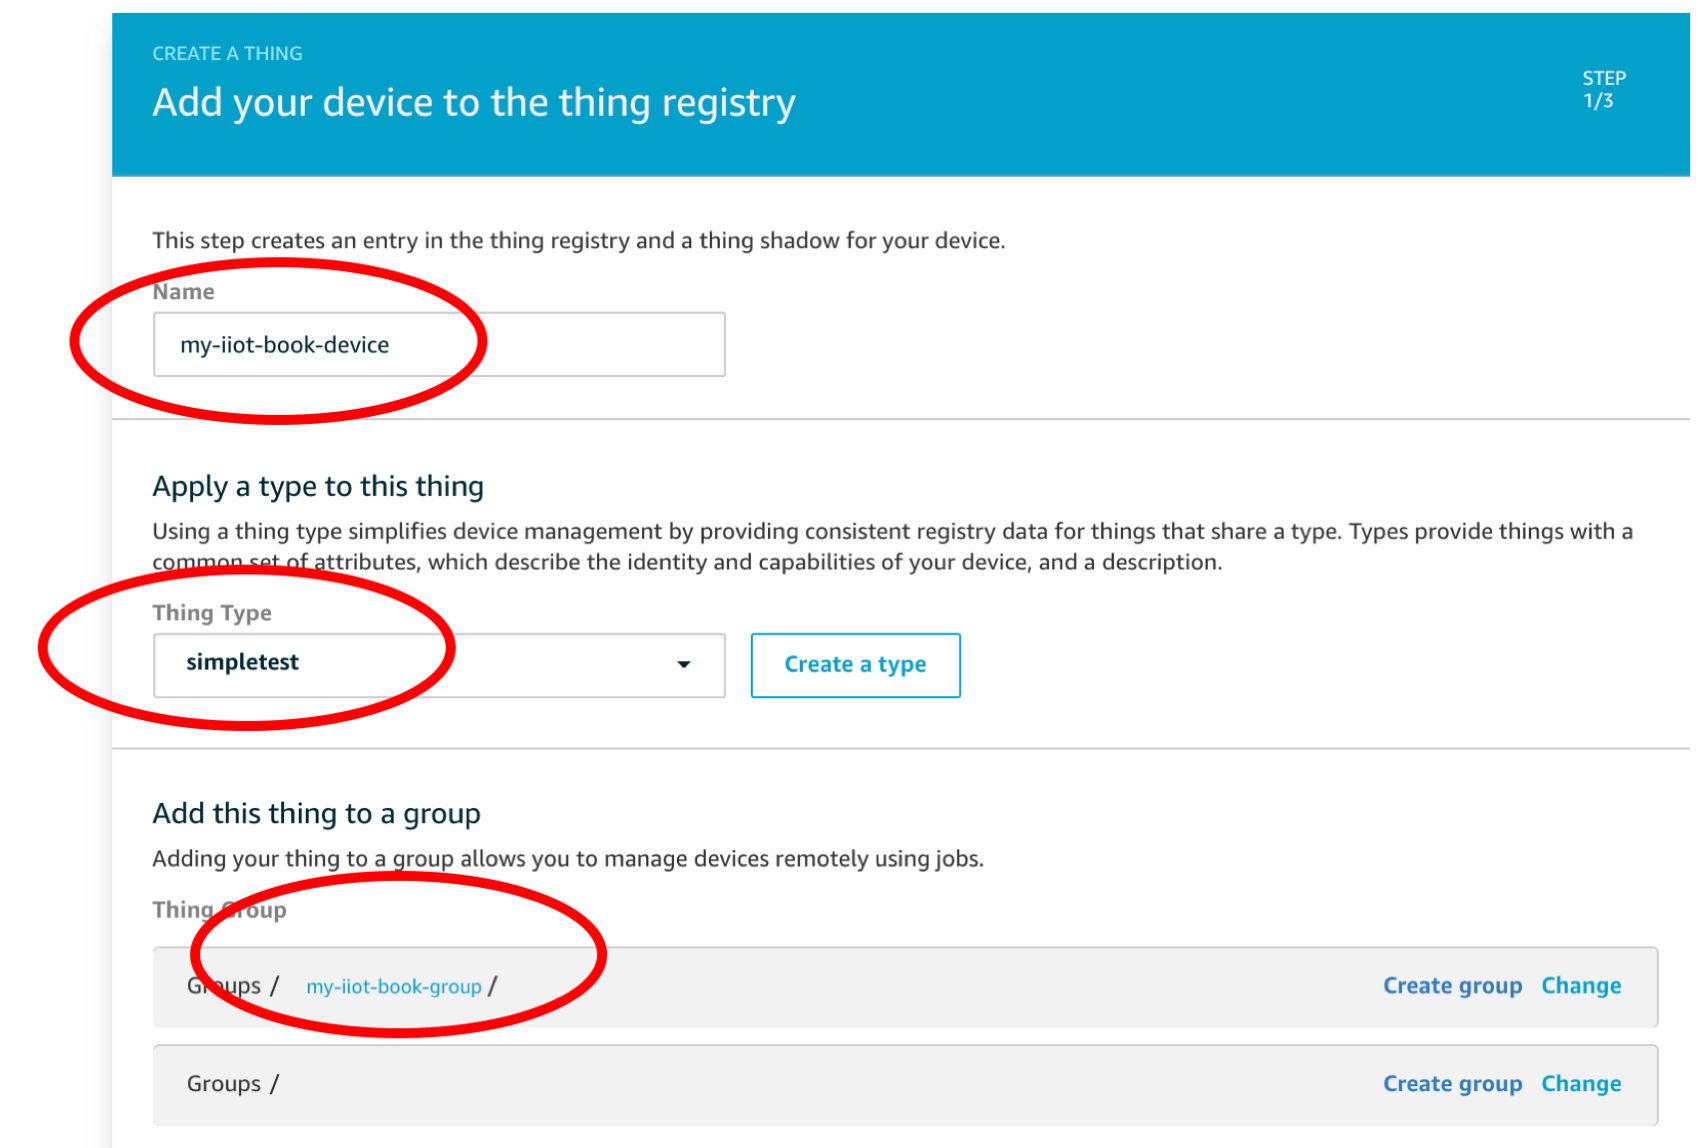
Step 1: Register an IoT Device in AWS IoT Service
Only AWS IoT core registered devices can connect to AWS, Hence lets register and get unique device credentials for each device.
Steps are:
Open your browser an Login into your AWS Account.
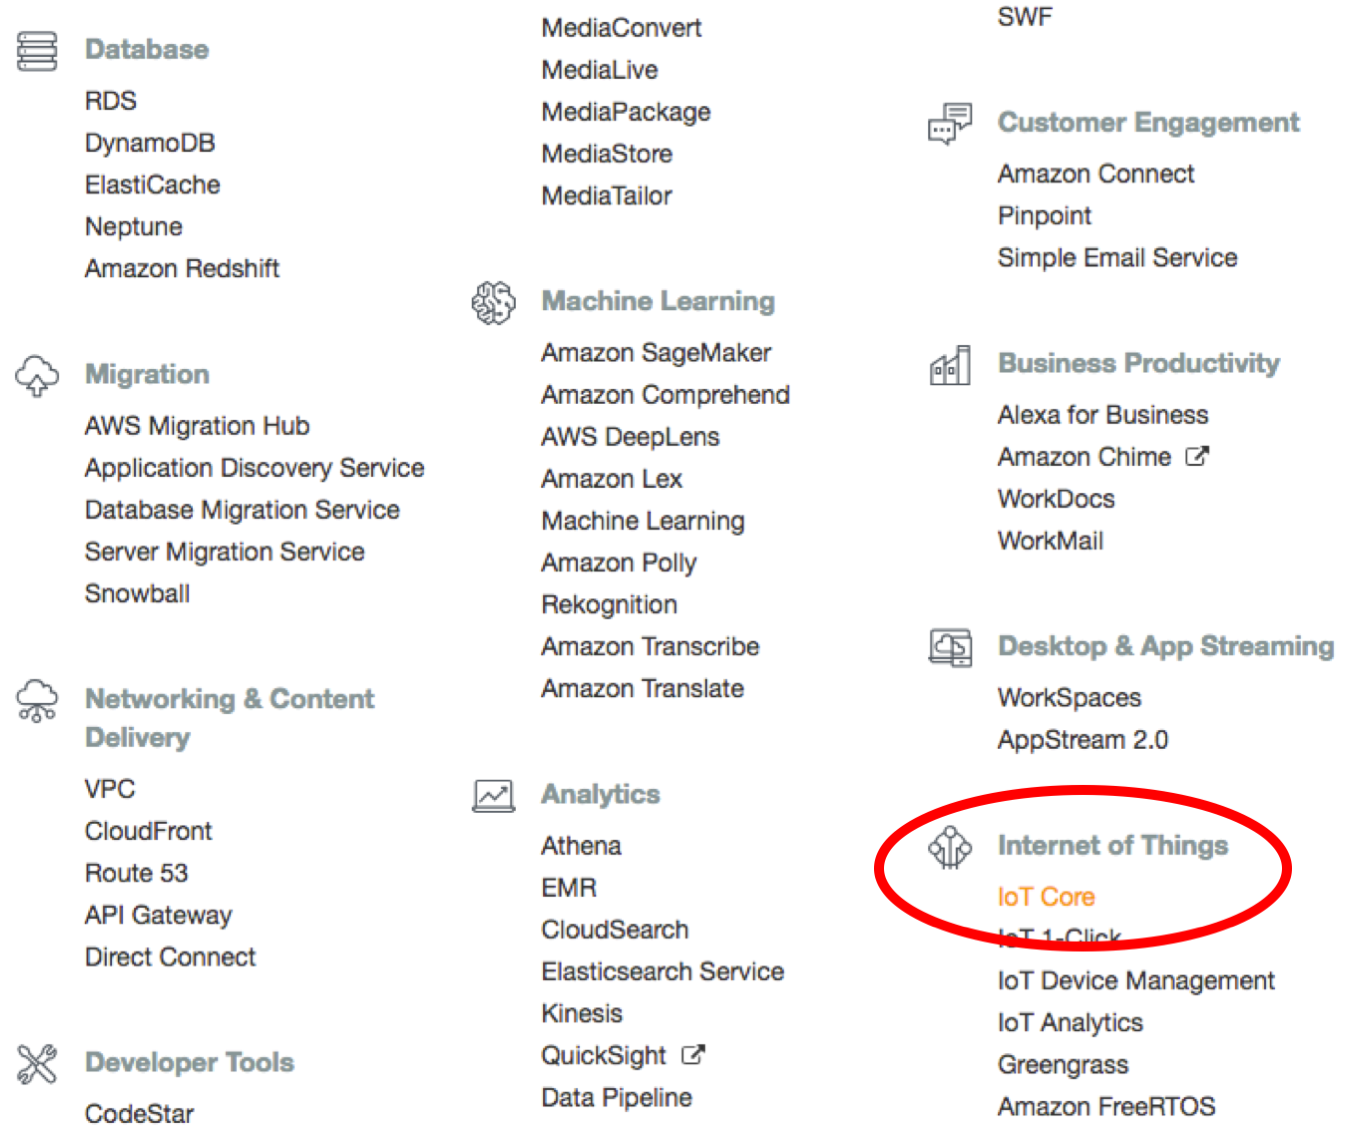
Goto AWS IoT Core service.
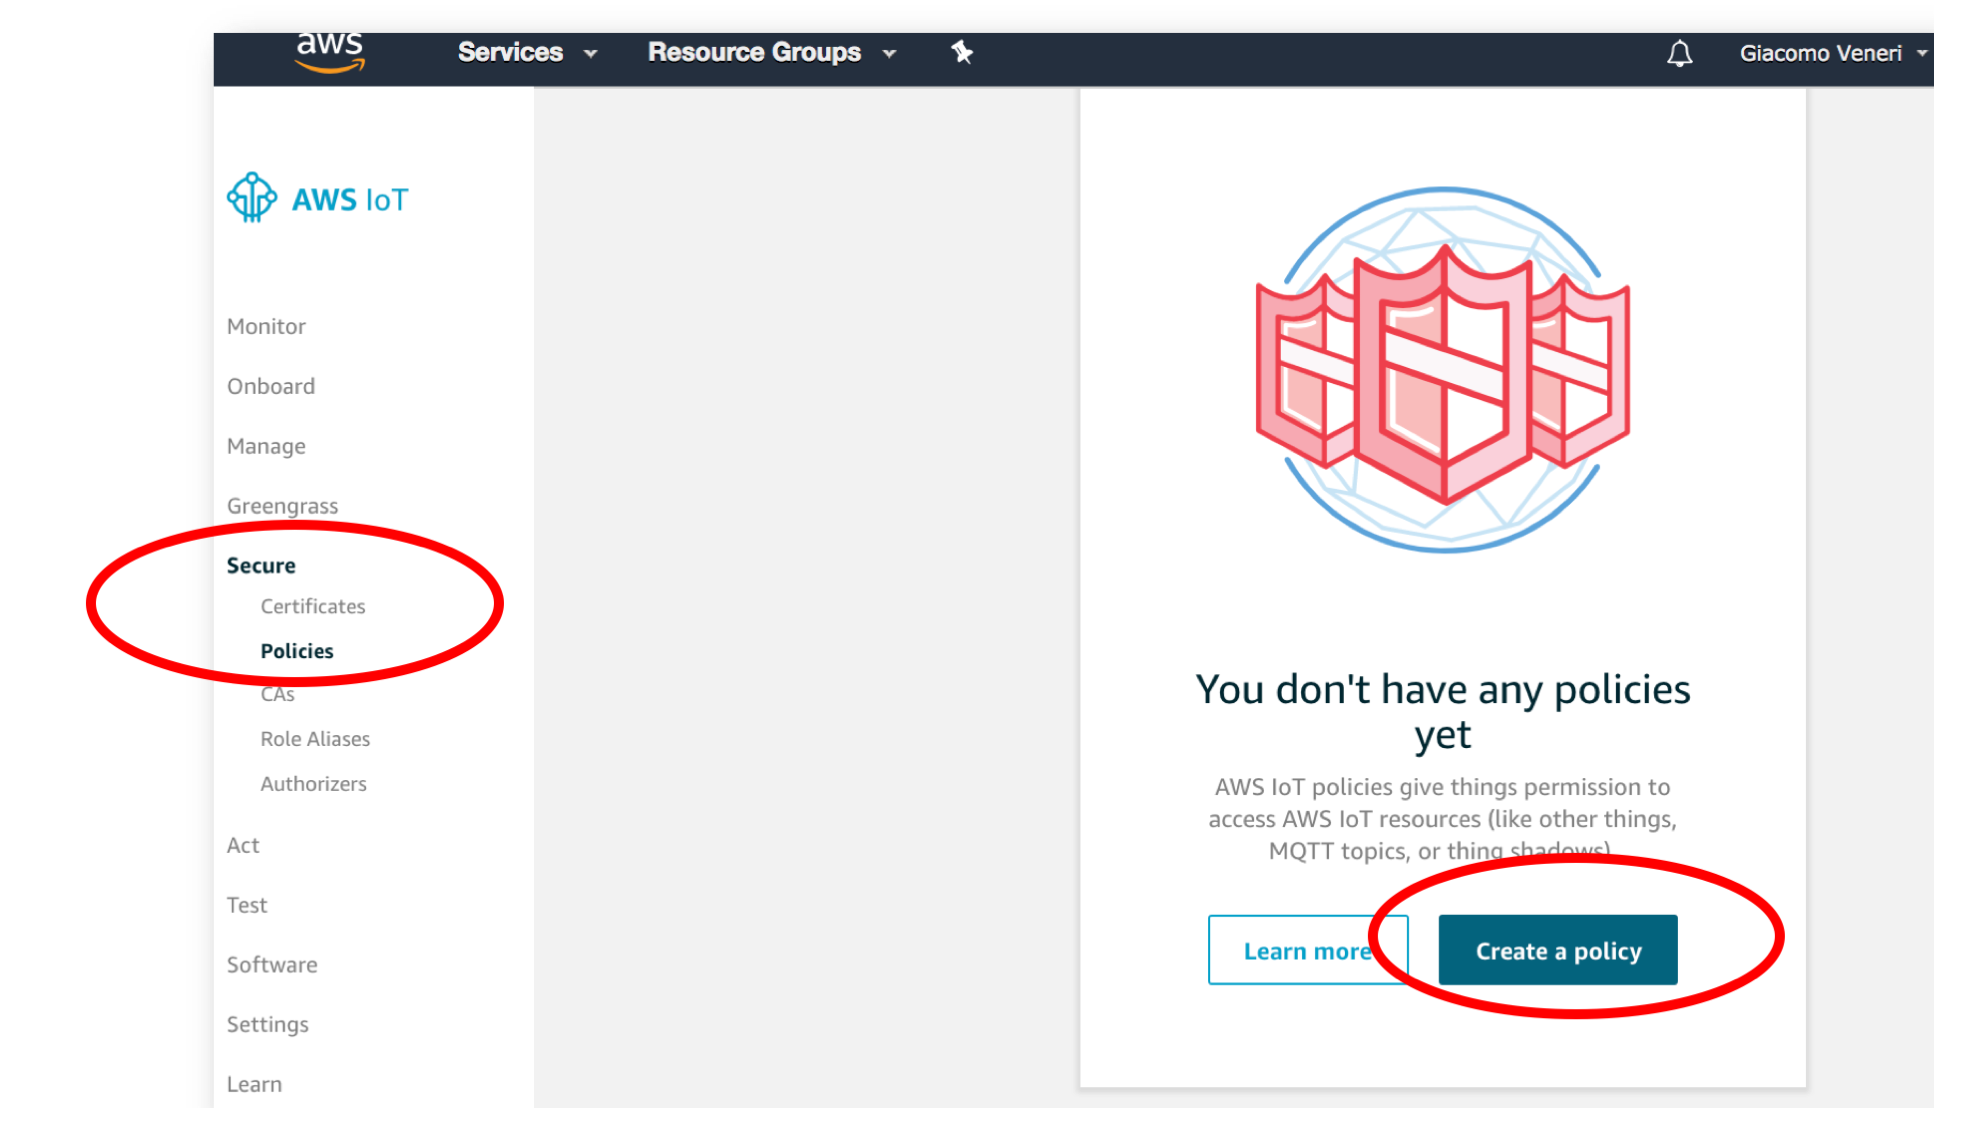
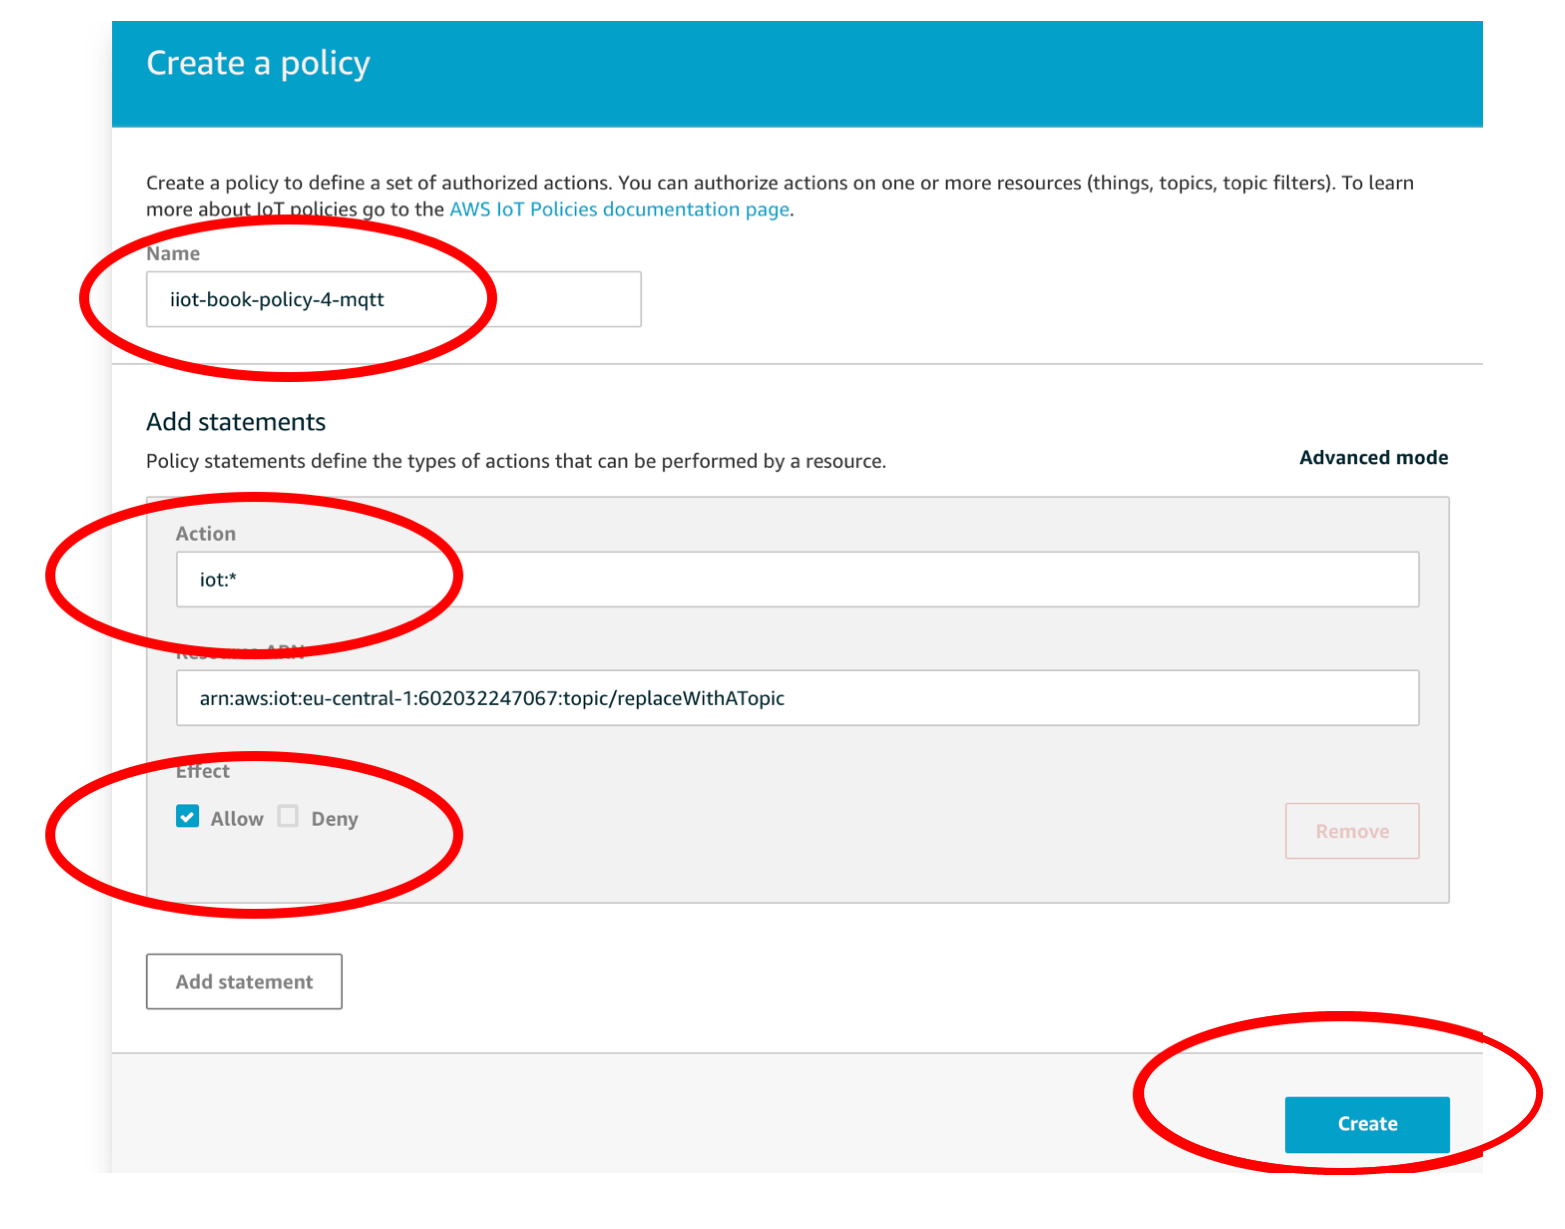
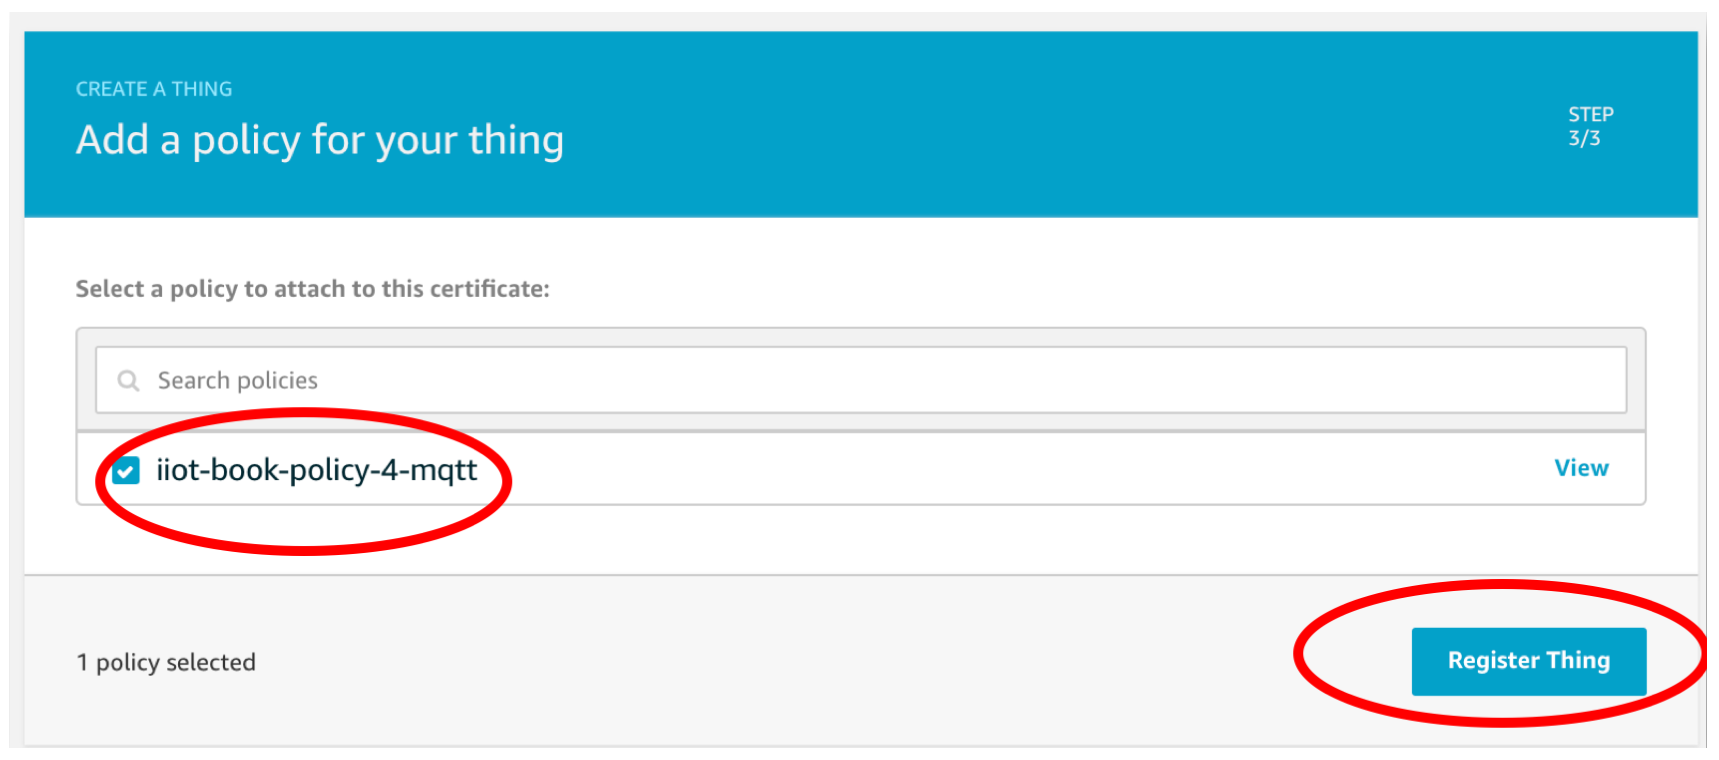
Create a AWS IoT Policy.
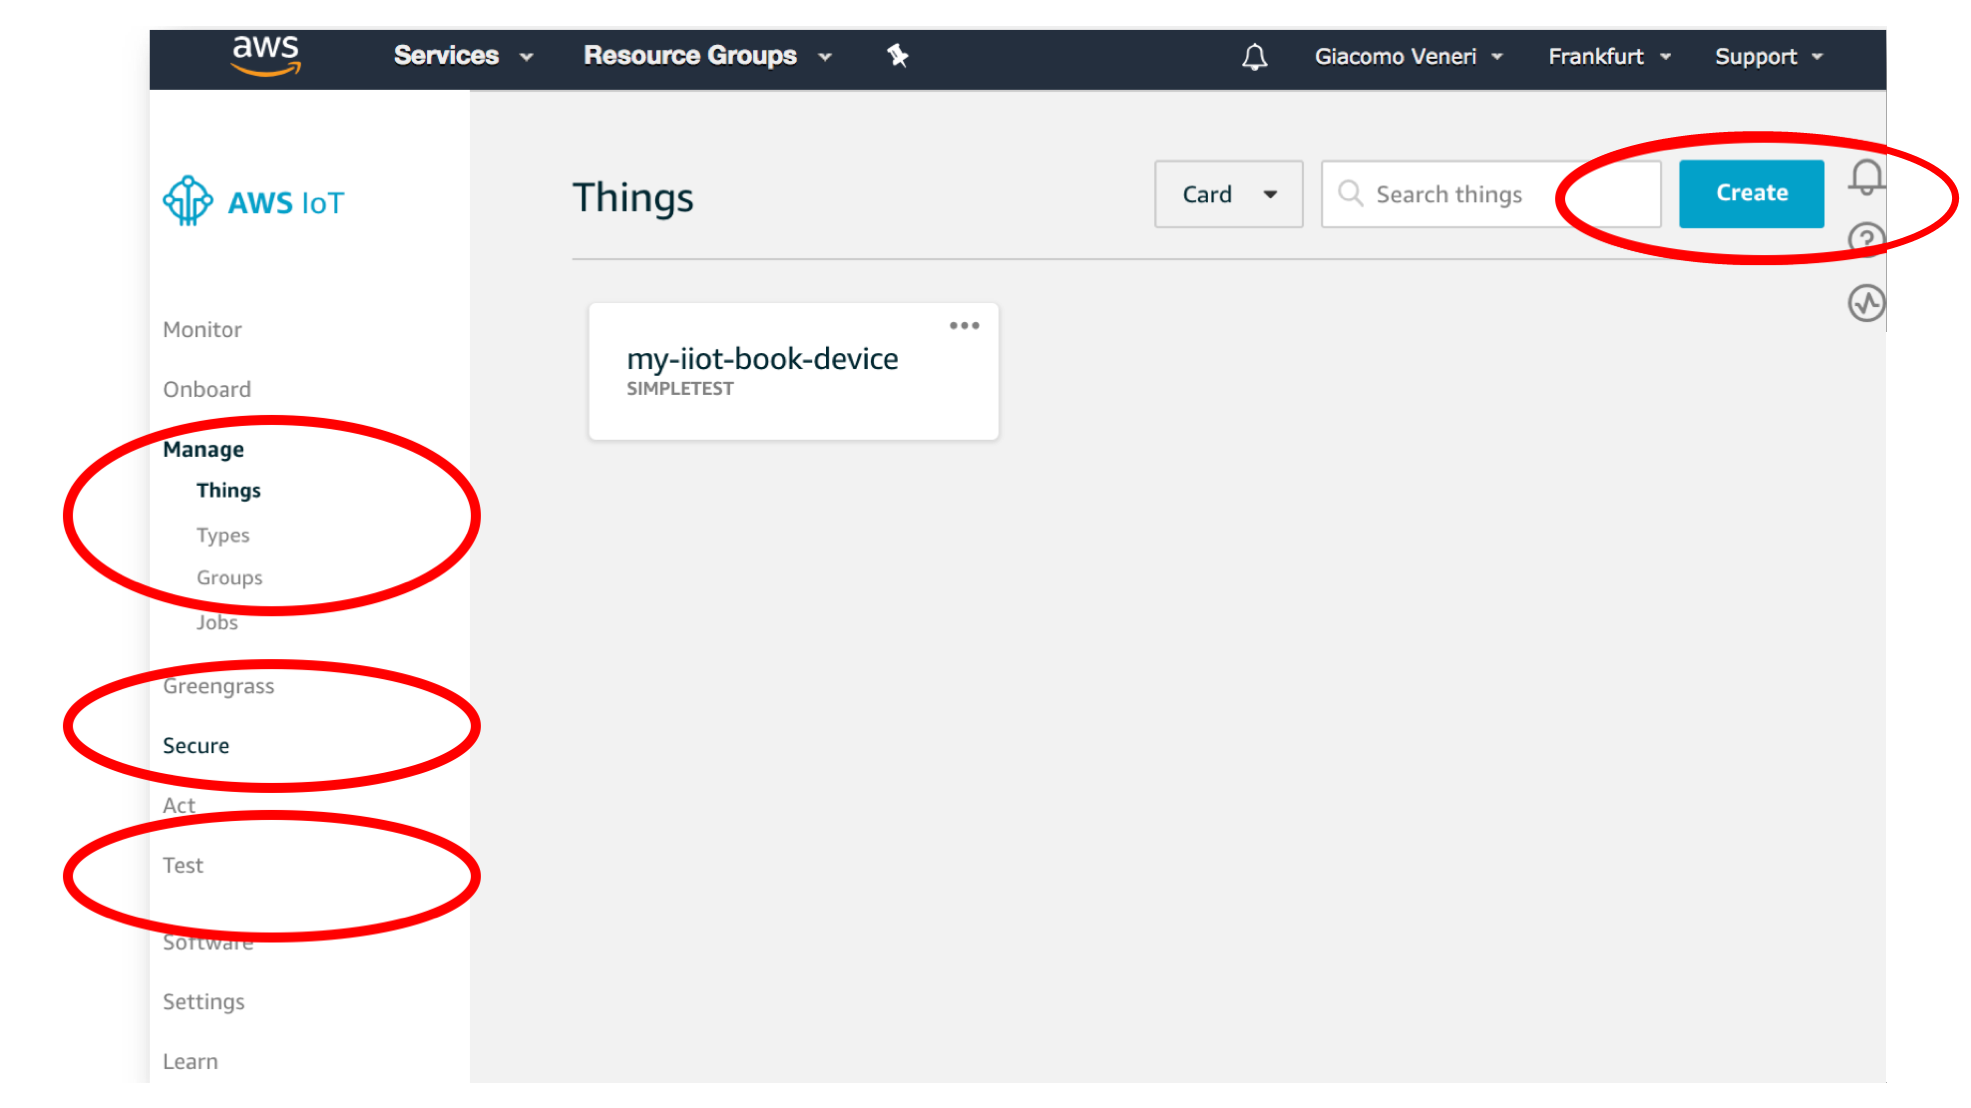
Register an IoT Device.
Download the certificates.
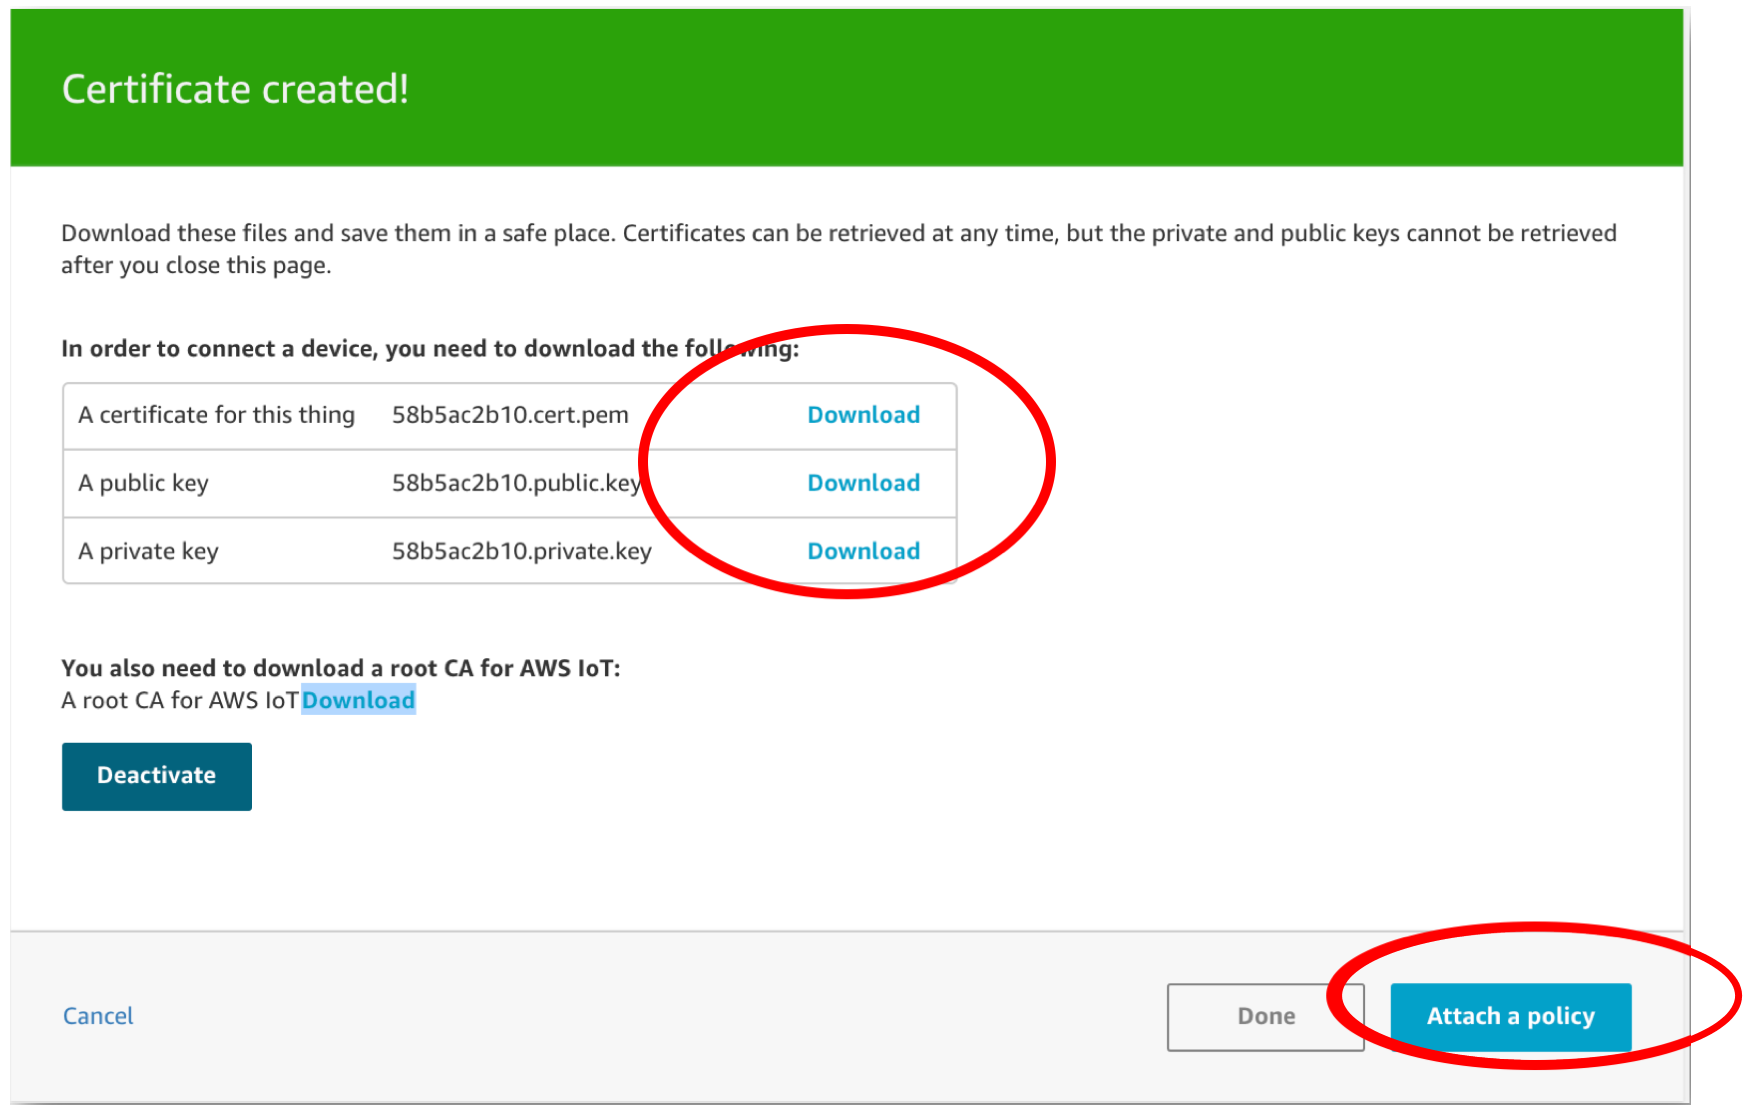
You will have to download 4 certificates
- Certificate for IoT device
- Public Key
- Private Key
- Amazon Root CA
caution
All 4 certificates are essential for connecting to AWS IoT Service. Failing to download any one of of the certificate will cause error in the program.
Store the certificates on the IoT Device
info
Manually copy the certificates into the IoT device via either SD card or via SCP or FTP.
Link the AWS IoT Policy to the Registered Device.
Step 2: Set AWS IoT settings in Shunya.
Set AWS IoT details, by editing the config file /etc/shunya/config.json inside Shunya OS.
A simple configuration should contain these parameters.
| Config | Description |
|---|---|
awsMqttEndpoint | AWS endpoint |
awsMqttPort | AWS connection port, usually it is 443, 8883 incase 443 is blocked by company proxy |
awsMqttCertDir | Directory where you have stored all 4 of the AWS certificates. |
awsMqttClientCert | Name of the Certificate of the IoT device. |
awsMqttPrivKey | Name of the Private Key of the IoT device. |
awsMqttRootCert | Name of the Amazon Root CA of the IoT device. |
awsMqttClientId | Unique Identification of the client, user can put any name that is convenient. |
Example configuration:
Writing the below json in /etc/shunya/config.json file, will tell the Shunya stack to connect to AWS
IoT service.
"awsSettings": {
    "awsMqttEndpoint": "a3rh361ag55y5n-ats.iot.us-east-2.amazonaws.com",
    "awsMqttPort": 8883,
    "awsMqttCertDir": "../certs/",
    "awsMqttRootCert": "AmazonRootCA1.pem",
    "awsMqttClientCert": "c0109d3db9-certificate.pem.crt",
    "awsMqttPrivKey": "c0109d3db9-private.pem.key",
    "awsMqttClientId": "rpi-test-23"
}
caution
Certificate directory path has to be relative from the directory where your program is running.
Note: Passing absolute path will cause Errors.
An absolute path is /home/shunya and a relative path will be ./../shunya.
Step 3: Send data to AWS IoT Service
Let's take an example use case: Say we need to
- Read data from the temperature sensor connected to Shunya and,
- Send the data to topic "temp".
Steps are :
Start with an ready to use template for sending messages via MQTT
git clone https://gitlab.iotiot.in/repo-public/examples.git
cd examples/demo-examples/send-data-to-awsOpen the
aws_example.cin an text editor and modify as per your use case.For our example, we need to first get the temperature data, add the code in your
main()functionfloat temperature = 76.98; /* For now lets assume that the temperature is 76.89 Celsius*/Sending temperature data to topic, modify the code
float temperature = 76.98; /* For now lets assume that the temperature is 76.89 Celsius*/

/* Create AWS IoT instance */
awsObj test = newAws("awsSettings"); /* Argument = JSON Title, Load settings from JSON file */

/* Connect to AWS IoT Core */
awsConnectMqtt(&test);

/* Send data to AWS IoT core */
awsPublishMqtt(&test, "temp", "%.2f C", temperature);

awsDisconnectMqtt(&test); /* Disconnect AWS IoT */Once you are done editing, save and compile the code , by running
mkdir build && cd build
cmake ../
makeRun the code
sudo ./aws_exampleMore examples to send messages to AWS IoT using shunya stack
- Send JSON string
- Send multiple variables
For sending JSON, change code in step 4. with the example given below.
char json[1024] = "{ "temp": 78.9, "sensor_name": "BME280" }";

/* Send a json to topic "temp" via AWS IoT core*/
awsPublishMqtt(&test, "temp", "%s", json);For sending multiple variables, change code in step 4. with the example given below.
float temperature = 76.89;
int humidity = 98;

/* Send a string to topic "temp" via AWS IoT core*/
awsPublishMqtt(&test, "temp", "temperature: %f, humidity: %d", temperature, humidity);
Step 3: Receiving messages via MQTT
Let's take an example use case: Say we need to
- Receive the temperature data from the "temp" topic
- Print the temperature data to a file when the message is received.
Steps are :
Start with an ready to use template for receiving messages from AWS IoT Core
git clone https://gitlab.iotiot.in/repo-public/examples.git
cd examples/demo-examples/send-data-to-awsOpen the
aws_example.cin an text editor and modify as per your use case.For our example, we need to first edit the code to store the received message to at file.
Add the code to print to a file in
processMessages()functionvoid processMessages (int topicLen, char *topic, int msgLen, char *msg)
{
/* For now lets print the message.*/
printf("Received message\n\tFrom Topic: %s,\n\t Message: %s", topic, msg);
/* Print the message to a file */
FILE *file;
file = fopen("database", "r");
if (file != NULL) {
fprintf(file, "%s\n", msg);
}
fclose(file);
}Now lets subscribe to the topic "temp", so we can start receiving messages
/* Create AWS IoT instance */
awsObj test = newAws("awsSettings"); /* Argument = JSON Title, Load settings from JSON file */

/* Connect to AWS IoT Core */
awsConnectMqtt(&test);

/* Send all the messages received to our processing function */
awsSetSubCallbackMqtt(&test, processMessages);

/* Send data to AWS IoT core */
awsSubscribeMqtt(&test, "temp");

awsDisconnectMqtt(&test); /* Disconnect AWS IoT */Once you are done editing, save and compile the code , by running
mkdir build && cd build
cmake ../
makeRun the code
sudo ./aws_exampleMore examples on receiving messages via MQTT shunya stack
- Receive JSON string
For sending multiple variables, change code in step 4. with the example given below.
void processMessages (int topicLen, char *topic, int msgLen, char *msg)
{
    /* Parse JSON message using rapidjson */
    rapidjson::Document jsonMsg;

    jsonMsg.Parse(msg);

}
Understand this component with an example (ready to use code)
Let's take an example use case: Say we need to
- Subscribe to the topic "devices/instructions" and Turn on LED when we receive the message "LED".
- Publish "LED" to the topic "devices/instructions".
- Here we will be using both Publish and Subscribe features of MQTT.
Steps are :
Start with an ready to use template for MQTT
git clone https://gitlab.iotiot.in/repo-public/examples.git
cd examples/full-examples/awsOpen the
aws-example.cin an text editor and modify as per your use case.For our example, we need to first load the AWS MQTT settings, add the highlighted code in your
main()function/* Create a mqtt object */
awsObj test = newAws("awsSettings"); /* Argument = JSON Title */Connect to the MQTT broker, add the highlighted code in your
main()function/* Connect to broker */
mqttConnect(&mqttBroker);Register the message processing function, add the highlighted code in your
main()function/* Send all the messages received to our processing function */
mqttSetSubCallback(&mqttBroker, processMessages);Process all the received messages and take action when message LED is received at topic "devices/instructions" ,
/* This function will get called everytime the Subscribed Topic receives a message */
void processMessages (int topicLen, char *topic, int msgLen, char *msg)
{
    /* Check if the message recevied is from topic "devices/instructions" */
    if (strncmp(topic, "devices/instructions", strlen("devices/instructions")) == 0) {
        /* Check if the message received is LED */
        if (strncmp(msg, "LED", strlen("LED")) == 0) {
            /* Turn ON LED */
            setLed(40, ON); /* Turn on LED */
        } else {
            setLed(40, OFF); /* Turn off LED */
        }
    } else {
        setLed(40, OFF); /* Turn off LED */
    }
}Subscribe to the topic "devices/instructions" ,
/* Receive messages from topic "devices/instructions" via MQTT*/
mqttSubscribe(&mqttBroker, "devices/instructions");Publish "LED" to the topic "devices/instructions" ,
/* Send a message to topic "devices/instructions" via MQTT*/
mqttPublish(&mqttBroker, "devices/instructions", "LED");Once all the operations are done for MQTT, disconnect from the broker at the end,
mqttDisconnect(&mqttBroker); /* Disconnect from MQTT broker */Once you are done editing, save and compile the code , by running
mkdir build && cd build
cmake ../
makeRun the code
sudo ./mqtt-example.c